Capturing the "Moody Blue" Image
I explain to each of my photography classes that photography is about light – hence, the mood in a photograph is dictated by light. The challenge that we, as photographers, are faced with is demonstrating mood, thoughts and meaning to a viewer without being present ourselves! Yes, photography is visual communication! If we are not there, we must rely on our skillset to create visual clues generating a visual experience for the viewer. The photographer may also be faced with creating an image to depict that same mood at a time, when it would not be possible to achieve. Think about a Mardi Gras theme in June, which can be done with props. Think about the warm gold tones of morning/late afternoon light – I would reach for my Photoflex 39x72 LitePanel or one of my Photoflex Lite Discs during a midday or evening session.
The Moody Blue, as I call it, is just that type of image.
The premise – capture an image that shows a “cold” or blue background with the subject exposed properly. The challenge - capture this image in Florida on a day where the mercury was above 90 degrees and the humidity above 90%. Those of you familiar with Florida know this is a fairly normal condition here in the summer months. The location is Harry P. Leu Gardens , a 47 acre botanical garden in the middle of the city.

In the first image, I approached the task as I would most standard portraits. I chose a Nikon 50mm f1.8 as the lens. I enjoy shooting with the “nifty-fifty” and the aperture, at a wide open f1.8, would achieve a substantial blurring of the background. I set the camera to Portrait picture control setting to render the skin tones softly and more evenly, but also because of the slight softening of the focus. I was hoping to add a slight bit of mood by softening the crisp focus ever so slightly. Shooting in shade, I added +.7 exposure compensation for just a bit more light and set my white balance to shade for color accuracy. To add to the feeling, Katelyn had brought along some tops that were blue in color along with wearing white shorts. My goal was not only the blue background, but to have he, except here face and hands, blend into the overall blue cast I was working towards. She was a real professional that morning – as I mentioned the mercury was above 90 degrees and the humidity above 90% - the blue top is a sweater and it really helped the overall feel of the scene.
The resulting image established the basis for the correct blurring, pose and location. It took a number of test frames to establish all of this – just like a movie director wants a specific look or feel to a scene, a photographer will do the same. My exposure in this image was ISO 100, 1/250 @ f1.8
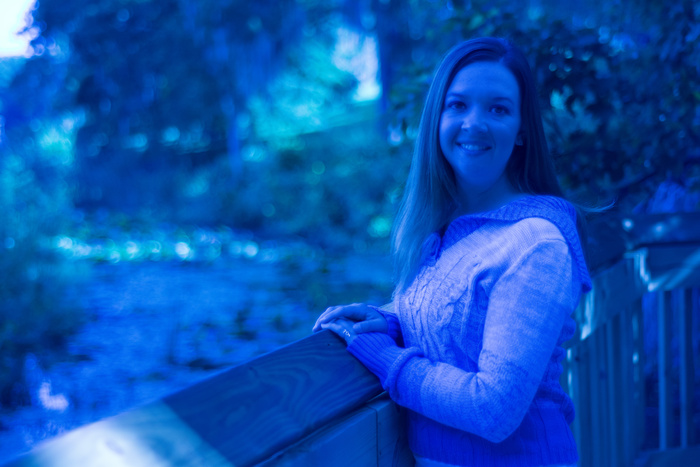
In the second image, I retained all of my original setting except for one – white balance. The white balance was manually adjusted to 2,000° K. By telling the camera that the color temperature in the yellow/orange color range, the camera’s programming added blue tones to compensate. Had the scene actually been in the color temperature range of 2,000° K, the image would have had the correct colors reproduced. As can be seen, the image has a strong blue color cast. I began shooting at about 2900°K testing the varying amounts of blue and the effect I working for. So again, I shot a few test frames to get what I wanted. Katelyn knew what I was trying to achieve and by sharing the images on the LCD, the session turned into collaboration between us as her ideas became part of the resulting image. I have always found better success in a session by sharing and exchanging ideas. My exposure in this image remained ISO 100, 1/250 @ f1.8
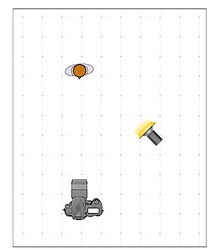
At this point I turned on my Photoflex Flexflash 200w positioning it at a 45° angle to Katelyn’s left, Just above her eye level. Instead of a Photoflex HalfDome - which is my favorite light modifier to use - I chose the 7” reflector and taped two large CTO gels over the front of the flash.
By keeping the white balance set at 2,000° K, the CTO (Color Temperature Orange) gels would compensate for the blue cast on Katelyn only. Katelyn was wearing a blue and white sweater and white shorts, which would still blend into the image’s desired overall blue cast. Anything on Katelyn not originally blue should render as color correct in the final image. This would be her hands, hair and face.
Before proceeding, the flash must now be positioned. I enjoy having 100% control of my images, therefore TTL flash is not in my back of tricks. All of my flash images are controlled with manual flash.
For the flash I always fall back to the Flash Circle for determining settings. I learned this years ago in my high school days and it has never failed me.
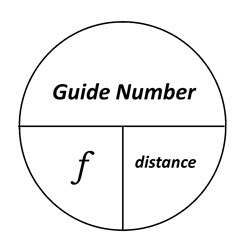
Previously I had established that the Photoflex Flexflash 200w has a Guide Number of 100 (see LiteBlog - “Determining the Guide Number for FlexFlash 200W” September 2015). The Flash Circle is designed to help the photographer determine each of three variables for working with a flash. In this case, I have determined the desired aperture to be f1.8 and I already know the Guide Number is 100. I need to determine the distance from the flash to Katelyn. If I were to block the word distance in the circle, it would show Guide Number over aperture (f). mathmatically this is Guide Number divided by aperture equals distance. So, 100/1.8 = 55.
Wow – at f1.8, the flash needs to be 55’ away from Katelyn. I need to shorten that distance to minimize the spread of the flash and for the fact that I do not have 55’ of space to make the shot. By cutting the flash power by one half, I can move it half the distance to the subject.
So, at 1/2 Power – 27’-6” from the subject.
At 1/4 Power – 13’-9” from the subject.
At 1/8 Power – 6’-9” from the subject.
At 1/8 Power I positioned the flash roughly 6’-9” from Katelyn and began to shoot. I made changes in lighting by subtle changes to flash position. My final exposure in this image remained ISO 100, 1/250 @ f1.8
Remember flash is controlled by aperture and distance. The shutter speed only ensures that the camera’s shutter is fully open during the exposure.
I tweaked the image slightly in post processing for cropping, sharpening and some light spill near Katelyn’s hands.

The Moody Blue, as I call it, is just that type of image.
The premise – capture an image that shows a “cold” or blue background with the subject exposed properly. The challenge - capture this image in Florida on a day where the mercury was above 90 degrees and the humidity above 90%. Those of you familiar with Florida know this is a fairly normal condition here in the summer months. The location is Harry P. Leu Gardens , a 47 acre botanical garden in the middle of the city.
In the first image, I approached the task as I would most standard portraits. I chose a Nikon 50mm f1.8 as the lens. I enjoy shooting with the “nifty-fifty” and the aperture, at a wide open f1.8, would achieve a substantial blurring of the background. I set the camera to Portrait picture control setting to render the skin tones softly and more evenly, but also because of the slight softening of the focus. I was hoping to add a slight bit of mood by softening the crisp focus ever so slightly. Shooting in shade, I added +.7 exposure compensation for just a bit more light and set my white balance to shade for color accuracy. To add to the feeling, Katelyn had brought along some tops that were blue in color along with wearing white shorts. My goal was not only the blue background, but to have he, except here face and hands, blend into the overall blue cast I was working towards. She was a real professional that morning – as I mentioned the mercury was above 90 degrees and the humidity above 90% - the blue top is a sweater and it really helped the overall feel of the scene.
The resulting image established the basis for the correct blurring, pose and location. It took a number of test frames to establish all of this – just like a movie director wants a specific look or feel to a scene, a photographer will do the same. My exposure in this image was ISO 100, 1/250 @ f1.8
In the second image, I retained all of my original setting except for one – white balance. The white balance was manually adjusted to 2,000° K. By telling the camera that the color temperature in the yellow/orange color range, the camera’s programming added blue tones to compensate. Had the scene actually been in the color temperature range of 2,000° K, the image would have had the correct colors reproduced. As can be seen, the image has a strong blue color cast. I began shooting at about 2900°K testing the varying amounts of blue and the effect I working for. So again, I shot a few test frames to get what I wanted. Katelyn knew what I was trying to achieve and by sharing the images on the LCD, the session turned into collaboration between us as her ideas became part of the resulting image. I have always found better success in a session by sharing and exchanging ideas. My exposure in this image remained ISO 100, 1/250 @ f1.8
At this point I turned on my Photoflex Flexflash 200w positioning it at a 45° angle to Katelyn’s left, Just above her eye level. Instead of a Photoflex HalfDome - which is my favorite light modifier to use - I chose the 7” reflector and taped two large CTO gels over the front of the flash.
By keeping the white balance set at 2,000° K, the CTO (Color Temperature Orange) gels would compensate for the blue cast on Katelyn only. Katelyn was wearing a blue and white sweater and white shorts, which would still blend into the image’s desired overall blue cast. Anything on Katelyn not originally blue should render as color correct in the final image. This would be her hands, hair and face.
Before proceeding, the flash must now be positioned. I enjoy having 100% control of my images, therefore TTL flash is not in my back of tricks. All of my flash images are controlled with manual flash.
For the flash I always fall back to the Flash Circle for determining settings. I learned this years ago in my high school days and it has never failed me.
Previously I had established that the Photoflex Flexflash 200w has a Guide Number of 100 (see LiteBlog - “Determining the Guide Number for FlexFlash 200W” September 2015). The Flash Circle is designed to help the photographer determine each of three variables for working with a flash. In this case, I have determined the desired aperture to be f1.8 and I already know the Guide Number is 100. I need to determine the distance from the flash to Katelyn. If I were to block the word distance in the circle, it would show Guide Number over aperture (f). mathmatically this is Guide Number divided by aperture equals distance. So, 100/1.8 = 55.
Wow – at f1.8, the flash needs to be 55’ away from Katelyn. I need to shorten that distance to minimize the spread of the flash and for the fact that I do not have 55’ of space to make the shot. By cutting the flash power by one half, I can move it half the distance to the subject.
So, at 1/2 Power – 27’-6” from the subject.
At 1/4 Power – 13’-9” from the subject.
At 1/8 Power – 6’-9” from the subject.
At 1/8 Power I positioned the flash roughly 6’-9” from Katelyn and began to shoot. I made changes in lighting by subtle changes to flash position. My final exposure in this image remained ISO 100, 1/250 @ f1.8
Remember flash is controlled by aperture and distance. The shutter speed only ensures that the camera’s shutter is fully open during the exposure.
I tweaked the image slightly in post processing for cropping, sharpening and some light spill near Katelyn’s hands.
